 SAIL MAKING - Creating Seams
by
Ben Morris
(last edited 08/06/2021)
Using the Board to make a seam
Prior to
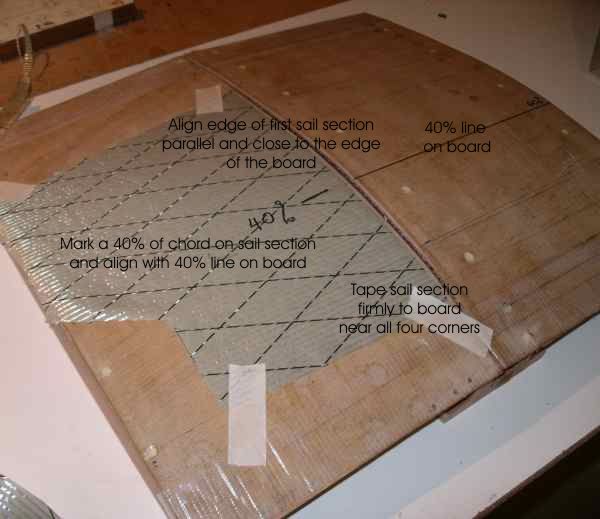
using the board I have found it most convenient to mark it with a line across
the two sections of the board with a line corresponding to the point of maximum
curvature (originally 40% now 43%). By marking the sail panels at the 40%
(43%) point and lining these two up as in the first photo ensures the maximum
curvature is at the correct location on the sail. Alternatively or as well
additional lines representing various fractions of the leading section and
trailing section of the board can be drawn and numbered in pairs such that
the 40% (43%) line still applies. That way spreading the material between
two lines of the same number also ensure the point of maximum curvature is at
the correct position.
-
Place
the correct lifting blocks under the front and rear edges of the board
corresponding to the correct curvature. Place
the first piece of sail material on one side of board and secure with masking
tape. Place it so that the seam to be lies next to the opening between
the the sections of the board

-
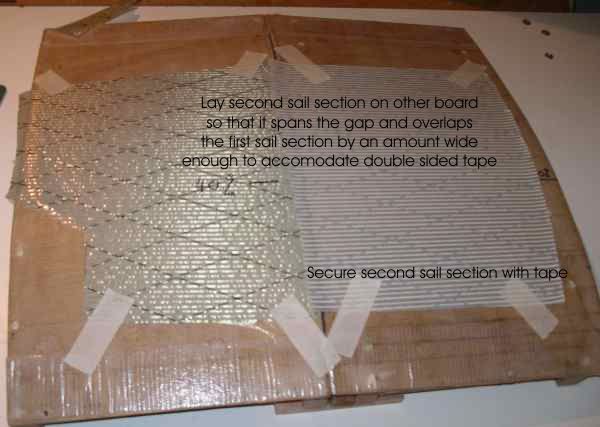
Secure next piece of sail material on other half of board. Overlap the
gap between the boards and sufficient of the first piece of the sail to
allow for a seam equal in width to the double sided tape being used to join
the sail.

-
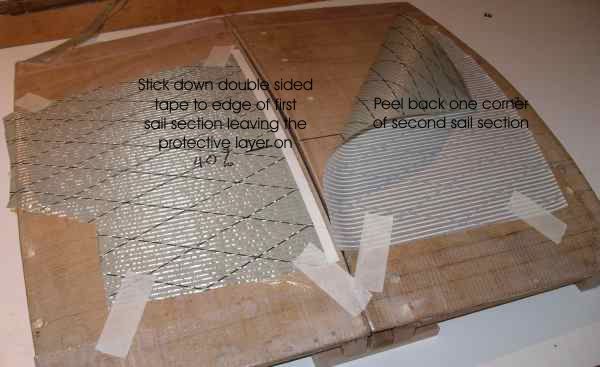
Peel
back one corner of the top sail material and temporarily secure down.
Apply the double sided tape to the lower sail section. Do not peel
back the protective layer yet! It may be easier to add the masking
tape before placing the second piece of sail material in place. This
makes it easier to see the amount of overlap required just to cover the
tape.

-
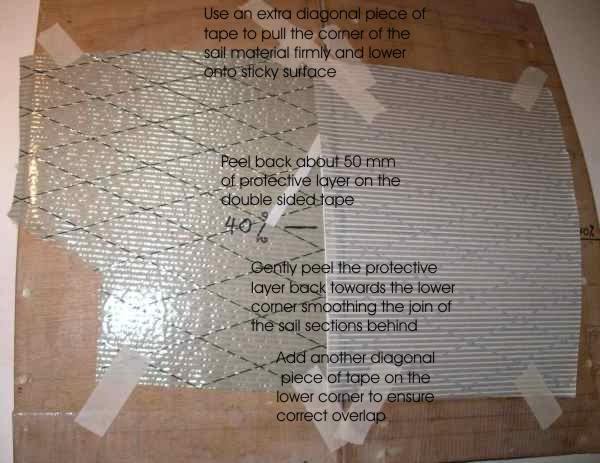
Add a
diagonal piece of masking tape passing through the corner of the top sail
section. Peel back about 50 mm of protective layer and using the
diagonal piece of tape lower the the top sail material onto the sticky
surface. A gentle tension on this tape will ensure the overlap is
correct. (It is too easy to get a 'soft' leech or luff if this tension
is not applied. A similar diagonal piece of tape must also be used at
the other end of the seem. Peel back the protective layer and use your
hand to sweep the top sail over the lower to allow the sticky tape to do its
job.

-
Remove all of the protective layer from the double side sticky tape ensuring
tension on the last diagonal tape. Run your thumb along the join to
ensure the adhesive is making contact with both sail surfaces. Remove
the tapes carefully. This should produce a very smooth and accurate
seem with the built in curvature defined by the board and its lifting blocks
-
Rather
than using masking tape to secure each sail panel to the board a much better
idea is to spray the board surface with spray contact adhesive prior to
using the board. This holds each panel very securely yet allows the
panels to be removed easily. It particularly holds the middle part of
the panel (near the 40% mark in the above picture) where slight movement
here during the joining will vary the curvature quite significantly (thanks
Lawrie) As an alternative to having the spray over the whole board
which will be very difficult to remove and replace later, lay a strip of
double sided sticky tape on either side of the join across the whole board.
Remove the backing layer to leave a thin layer of adhesive right at the
position that it is needed underneath the seam. The stickiness off
this adhesive will need to be reduced by repeated touching it with the heel
of the hand a few times. This is a much neater solution to the problem
of holding the panels in position while the seam is being made.