 SAIL MAKING - Using Diagonal Seams
by
Ben Morris
(last edited 08/06/2021)
Diagonal seams
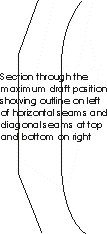
The top seam in a sail often has a very short chord of 150 mm
or less. To get the broad seaming to work over this distance requires very
accurate work as errors are much more significant than with a seam of 300 mm.
One way around this is to make the top seam diagonal sloping it up from the luff
to the leech. This also has the advantage of forcing that top curvature
higher in the sail so supporting the top section of the leech. In order to
keep the calculations the same I ensure the point of maximum camber is still
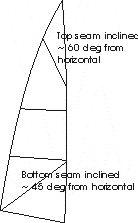
placed at the same location as the replaced horizontal seam. The angle
used is between 45 and 60 degrees. This really powers up the top section
of the sail and improves the light air performance significantly. In fact
I have been reducing the curve in that seam by a degree or two to produce a sail
with better all-round performance.
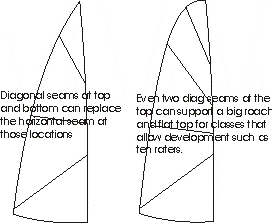
A similar concept can apply to the bottom seam but here I do
it a different way. Instead of replacing the first horizontal seam with a
large diagonal seam I add a diagonal seam from the clew to the luff just below
the first seam. The reason for not using a larger diagonal seam is that
the length of the diagonal seam would become a little impractical without
building a special board. In addition what this does is to introduce the
curvature from the foot to the first seam in a graded way rather than in a step
as the horizontal seam does. The required curvature is split between the
two seams roughly 50/50. Remember tho that as the distance to the seam is
smaller in the diagonal seam it will need to be given a greater lift on the
board. An example might be to replace a horizontal seam requiring a 4 mm
lift of the building board, I would use only 2 mm on the horizontal seam and
about 3 mm on the diagonal seam. Again experience suggests this produces a
faster and more flexible sail. I'm sure the diagonal seam spread along the
direction of the stress in the sail material from the clew helps support the
sail as well.
Remember that some classes such
as IOM have special requirements which prevent seams being closer than 120-150
mm to a clew or head point. Seams would have to be adjusted accordingly
but sails can still be made with diagonal seams even here.
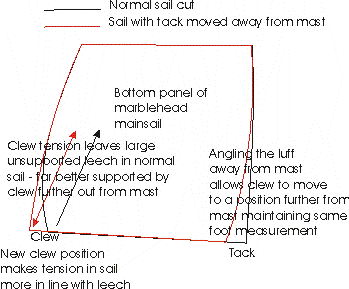
More on Luff curves
While this applies more to marblehead main sails than others,
the principles apply equally well to all classes. I have an issue the
setting of the mainsail near the tack when the luff curve is just brought down
the sail to the clew with little added curve. It does not allow for much
adjustment in or out from the mast to get the sail to set there. I have
been now putting a much more pronounced curve near the bottom of the luff so the
tack is designed to sit a good 10-15 mm from the mast. This allows much
more space to adjust this distance to get a good set of the sail. It has
an added advantage in a marblehead sail of pushing the clew further outboard
(the 10 - 15 mm lost at the front). This means that the clew supplies the
force up the sail now much closer to the leech than is the case with the normal
marblehead sail. This supports the leech better and reduces the tendency
for the sail to develop a diagonal fold towards the upper middle of the luff.
Again experience suggest a faster and more flexible sail.
 STIRLING MARBLEHEAD YACHT RACING CLUB
Inc.
STIRLING MARBLEHEAD YACHT RACING CLUB
Inc.